
Gingerbread House Gift Bags With Lights In Windows Easy DIY Christmas Craft
I absolutely love this easy DIY gingerbread house gift bag idea! It’s a budget-friendly Christmas craft that’s simple to make, and a perfect way to upcycle a plain kraft paper bag from the store. If you have unused brown paper bags at home, this project is a fun and creative way to give them new life. Light decor is budget-friendly too!
I discovered this gingerbread house gift bag DIY on Instagram and felt inspired to share it with you. The bag is quick to make, looks adorable, and is guaranteed to be one-of-a-kind. The design possibilities are truly endless — you can draw windows, doors, icing details, and decorations in your own style.
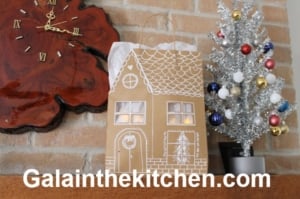
The natural brown color of a kraft bag makes it ideal for creating a gingerbread house Christmas gift bag. You can keep the design simple by drawing it on, but I especially love adding lights in the windows for a cozy, festive touch. It’s a charming detail that makes the gift bag feel extra special and magical for the holidays. Check the direction and create your own style gift bag!🎄

 Recommended ⇒ Turn a Gift Bag into a Purse Easy Upcycled DIY
What We Need:

- Kraft bag ( 10 x 13 x 4.5 )
- White paint marker
- Ruller (optional)
- Scissors
- Knife
- Thin cutting board (or cardboard)
Decor:
- Tissue paper (make sure it’s thin enough to see the light)
- String lights. I bought it locally in the “Dollar Tree” store for $1.50 in the craft area. This is a very noticeable, steady light.
*We can use 6 Tea light candles instead for a blinking light, like our house has a fireplace.
 Recommended ⇒ Easy Santa Paper Napkin Folding Idea For Christmas

⇓ The best are these string lights because they have a small battery. Online, you can find these lights with a battery included, each for under $0.50 ⇓

As an option, we can use colorful paint markers. Use stickers, make more colorful decor. Cut out the door open and much more!
 Recommended ⇒ 3 DIY Christmas Gift Bag Ideas for Under $1 or Free
How to Make Gingerbread from Kraft Bag:
- Start by lightly sketching the roof, windows, and door with a pencil. This makes it easy to erase and fix any mistakes, which is especially helpful if kids are doing the project. This step is optional, but it can make the process much easier.

2. Place a cutting board inside the bag so you don’t accidentally cut through the back. Cut out the two top windows, making sure between cutouts 1/2 inch. Color the windows first, then carefully remove the cutout pieces.
Important: Between cutouts is ½ inch wide. Thinner windows break easily, especially when goods are inside. While you can fix them with clear tape, making them wide enough from the start saves time and avoids extra repairs.
Optional: Reinforce the window edges of the gift bag with clear tape for extra strength and durability.

3. Draw the gingerbread house design on the bag, then cut off the corner to shape the roof.

4. Place the gifts and tissue paper inside the bag. Position the lights behind the cut-out windows, then turn them on just before presenting the gift.
*I used white tissue paper, but yellow or orange works beautifully as well for a warm, cozy glow.


The gifts in the photo below are ready to celebrate Christmas 2025 🎄
The lights in the bag windows aren’t very noticeable during the day, but in a darker room, they truly shine and look absolutely adorable ✨

 Recommended ⇒
DIY Gingerbread House With Lights in Windows Gift Bag
 Recommended ⇒ Shirt With Tie Out Of Paper Gift Bag 2 Easy Ideas

⇓ Check Out My Other Recipes ⇓


Leave a Reply
Want to join the discussion?Feel free to contribute!