
How to Make Moist Roasted Chicken on Salt – Salt Bed Technique

You won’t believe how juicy baked chicken can be until you try this simple salt-roasting technique! I was so surprised by the results that I just had to share this method on my blog. This technique isn’t just about the recipe—it’s about the science of cooking with salt this way. The salt bed helps distribute oven heat perfectly, allowing the chicken to cook gently without drying out. When salt is combined with heat and moisture, it travels deep into the chicken meat. It seasons the meat perfectly, locking in all those delicious natural juices. The result? A tender, roasted chicken that is incredibly easy to prepare. If you’re looking for an easy way to make juicy, oven-roasted chicken, this salt-bed technique is a must-try. Follow my step-by-step guide, and I will share some hacks and tips that I learned after making a few chickens with this technique. And of course, a scientific explanation at the bottom of the page.
Why You’ll Love This Technique:
Perfectly seasoned with salt chicken, and very juicy meat.

 Recommended ⇒ Easy Garlic Butter Sauteed Asparagus Recipe
1/2 pound large salt (Not Iodized)
1 chicken
1-2 tomatoes
3 tablespoons mayonnaise
1/2 teaspoon poultry seasoning
3 cloves of garlic or substitute for garlic powder
*This salt-roasted chicken recipe can have many variations. By changing the spices or marinade, you can easily create a completely new flavor each time. Just remember not to add salt to the marinade or the outside of the chicken, because the salt bed (actually salty steam) will naturally season the meat during cooking.
 Recommended ⇒ How to Make Decorative Frills for Turkey Or Chicken
- In a blender, mix a whole tomato. Add 3 tablespoons of mayonnaise, a poultry spice mix, and garlic.
*Or use tomato sauce from a can.

Very Important ⇒ Don’t add any salt outside the chicken!
2. Cut the tips of chicken wings. Coat the chicken with the tomato sauce mix. Inside, salt chicken is only inside as usual. Leave to marinade 1-2 hours.
I tried cooking chicken on salt without adding salt inside, just marinade but inside chicken was not salthy enought to my taste, so I suggest to salt inside if chicken is very large as my.

3. Wet salt with water so that you can make shapes from it, but not too much.

Preheat the oven to 350°F (180ºC)
4. Make a 1-inch layer of salt on a baking paper. Tighten up chicken legs and place chicken on salt, breast up. Bake 20 minutes for every pound (350ºF). Chicken is done when the meat thermometer inserted into a thigh, not touching bone, reads 165°F.

If you leave wing tips on, cover with foil to prevent burning it up. I usually cut off the tips of wings; there’s nothing to eat there anyway, but we can use them for chicken stock. I just freeze them and adding to other chicken meat and bones when ready to make a stock.
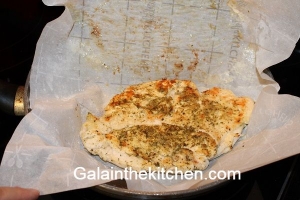
5. You’ll be amazed at how juicy and perfectly seasoned with salt this chicken is! The secret to the juiciest chicken ever? Science!

Look at how much juice is in the photo below! This is a very juicy chicken breast, and it is the way how to make very juicy chicken. Give this technique a try.

Try to add spices to the salt bed as well.
*I asked the Internet and got this explanation of the science behind the chicken on a salt bed.
🧪 The Secret is Osmosis! 🍗
Ever wonder why this chicken stays so incredibly juicy? It’s all thanks to a scientific process called Osmosis. When we cook with salt and moisture, the salt doesn’t just sit on the surface—it actually travels inside the meat. This process relaxes the chicken’s muscle fibers, allowing them to soak up and lock in more juice during the cooking process. The result? Instead of the moisture evaporating, the salt helps the chicken hold onto every drop! This season the meat and guarantees a perfectly tender bite every single time. ✨
 Recommended ⇒ 13 Easy Vegetable Garnishes
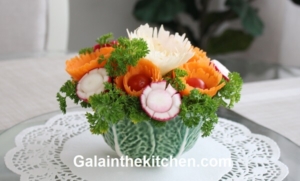
How To Garnish Roast Chicken Idea
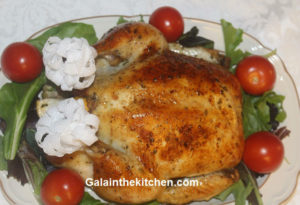
Let’s be honest—a bare bone on roasted chicken isn’t always the most appetizing look. Chicken papillotes (decorative frills) instantly elevate your presentation by covering exposed bones with a clean, crisp white finish. This simple technique creates a beautiful visual contrast, turning your roast into an elegant, restaurant-style centerpiece. While it may be a classic, old-fashioned detail, it remains timeless, festive, and perfect for Instagram-worthy food presentation.
Check how easy we can make chicken (turkey) frills ⇒ How to Make Decorative Frills
Gator Sandwich Garnish Idea Video
Once your chicken is ready, it’s perfect for ‘Gator Sandwich’—check out my garnish tutorial here!
 Recommended ⇒
⇓ Check Out My Other Recipes ⇓
 @Galainthekitchen.com
 @Galainthekitchen.com

 @Galainthekitchen.com
 @Galainthekitchen.com
Leave a Reply
Want to join the discussion?Feel free to contribute!