
⇓ Watch Video ⇓
11 Easy Ways To Pit Cherries With DIY Tools And More
Looking for a way to easily pit cherries? Check out my list of 11 methods on how we can remove stones from cherries with handmade tools and tools you might find at your house. Some of my friends have different opinions about their favorite way to depit cherries, so I listed all the methods I tried and my personal opinion about each method. You can find the best way how you like to pit cherries only after practicing. Old fashion DIY tools work well if we don’t have much on hand to use. Also, the different tool works better for different purposes we use cherries. For example, we use cherries for garnish and we need to remove the pit as gently as possible, so the fruit keeps its shape and has minimum damage. Check out which tool I use to remove the pit out of cherries for garnish, it works so well! The looks of our cherries do not really matter when we look at how to pit cherries for pies, preserves, drinks, drying, and freezing. However, the less cherry losing juice, than better no matter what we are going to do with our cherries after removing the pits. Check out my list and find your best cherry pit remover!
 Recommended ⇒ How To Make Your Own Cake Decorating Tools
*All methods I checked on sweet large cherries. I didn’t have tart cherries on my hands for many years but I know for sure, that most tools work well on them too.
11 ways how to remove pits from cherries:
- The best way how to pit cherries is without removing the stem for garnish. VIDEO
- How to pit cherries fast with a chopstick and bottle.
- Old-fashioned DIY cherry pitter made out of a fork.
- Cherry pitter removal made from a wire paper clip.
- Pit cherries with a small funnel.
- Use a metal pastry tip to pit cherries. (The best pastry tip to use my suggestion)
- Cherry pitter from tweezers.
- Smashing cherries with a knife in a plastic bag method. (All mess in the bag!)
- Remove the cherry pit with a knife and spoon.
- Zyliss cherry pitter. Tip the best way how to place cherries in pitter with photos.
- Review quick-release multi cherry pitter by OXO.
Cherry Pitting Tips For Less Cleaning of Hands and Kitchen
1. With most techniques for removing pits from cherries, I recommend wearing gloves. Cherry juice leaves stubborn stains on hands.
2. For a mess-free cherry pitting method, place your cherry pitter and hands inside a large, clear plastic bag. This simple trick keeps all juice splashes contained inside the bag, making it one of the easiest ways to remove cherry pits without the mess.
 Recommended ⇒ 11 Ways To Use Baking Parchment Paper In The Kitchen
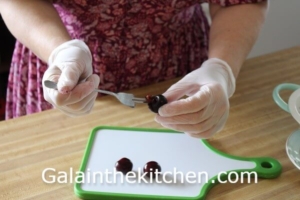
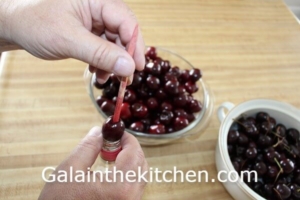
1. How To Pit Cherries For Garnish Without Removing The Stem

To pit cherries with less damage and without removing the stem for garnish we can do with a handmade cherry pitter made out of a skincare tool. The skin blemish extractor is the perfect tool to remove a cherry pit without much damage to the fruit. We can buy the blemish extracting tool at any store that sells a cosmetic product. I bought my set of 2 tools for less than $5.00 at “Marshalls”. Loops skincare tool works great to pit a cherry, I just widened slightly the larger loop with needle head tweezers. The technique is so easy and you can see in the photo the result. This is my favorite tool to remove cherry pits for garnish.
Drawback: The technique works for a small number of cherries because time consuming.
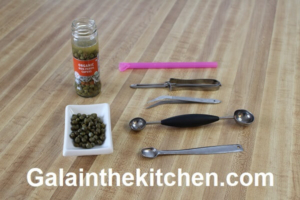 Recommended ⇒ 5 Clever Tools To Get Capers Easy Out Of Narrow Jars

Technique:
- Choose for presentation the best cherries without any damage.

2. Stick gently to the bottom of the cherry our pitting tool with a loop and rotate the loop around the stone.

3. Then pull the loop tool out with cherry stone.

4. The damage will be minimal.

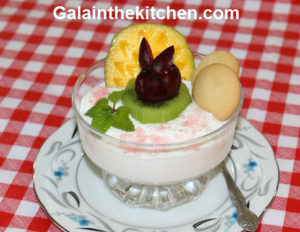
As you can see cherry doesn’t have much damage and is a great garnish for desserts. We can also remove the cherries stones to cover the cherries in chocolate and serve cherries for a fondue party. It is a great technique to serve cherries without pits to kids. In the photo below I add cherries to cottage cheese.


Video How To Pit Cherries For Garnish Tool Idea

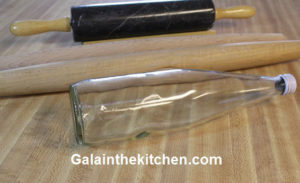
2. How To Pit Cherries Fast With Chopstick And Bottle

Bottle and a chopstick is a fast and easy DIY cherry pitter remover method for large amounts of cherries! This is the best cherry pit remover for a large number of cherries. Cherries come out more damaged than I described in the methods above, but it is a faster method by using what we have around in the kitchen. This method is great to pit cherries for a cherry pie or cherry jam because not an important cherry shape after we remove the pit. I used the wooden chopstick called candy apple sticks or corn skewers, but we can use instead of it reusable metal drinking straws.
*Cherries need to be well washed and stems removed. In the photo, I show cherries with stems in the bowl on the right, but to remove pits I used cherries from another container, which is not in the photo.
Drawback: Some cherries can be too small for the bottle opening, and we have to look for other options instead. Need to check every cherry to be sure the pits are removed. When working with a large number of cherries, this step must be done.
We need:
Glass bottle
Chopstick
*Most standard wine bottle works great. I like to use a small wine bottle, so I don’t have to put it so far up my hands when pitting my cherries. However, a tall bottle works well too if we put it in the sink for convenience and to prevent juices from cherry splashing around.
Technique:
- Place a cherry on the bottle. Push the dull end of the stick into the cherry as I show in the photo to remove the cherry seed.
Make sure the cherry is without the pit by slightly squeezing the cherry with your fingers on the side after each removal to make sure the seed comes out! Sometimes the stick goes on the side of the pit and the pit does not come out as should but it is not easy to control because of the many seeds in the bottle. When I work with a large number of cherries (it is messy!) I noticed the problem, so better to check than miss the seed in the cherry.
*If you have tart cherries and they are smaller than sweet cherries, you can try cut of a plastic funnel and using it for smaller cherries as the technique above. Another option can be a plastic sports water bottle push pull cover from a water bottle. You need to choose a lid that looks like a funnel. Cut it to the size of the cherry stone you need, so the cherry pit comes out and the cherry stays in. Place upside down on the bottle mouth and use it with a chopstick as a cherry pitter.
 Recommended ⇒ 5 Tools To Cut Wooden Skewers Easily And Neatly
3. Old Fashion DIY Cherry Pitter Made Out Of Fork

A bent teeth fork is a great old fashion cherry pitter tool! My grandmother used a bent fork as a cherry pitter and it was a long time ago. I found my fork to make my cherry pitter at a local Goodwill store for $0.20. I choose a fork that can be bent easily to make sure I can able to bend it. I used my husband’s needle head pliers first to bend two teeth down towards the back of the fork. Then I bent the tips of the second and third teeth in opposite directions. My cherry pitter is ready in less than 1 minute! Great to remove the cherry stone with minimum damage. We can use the fork with bent tines as a cherry garnishing tool and if you are careful it works. However, the loop cherry pitter which I described above works better.
Downside: Hard to remove pits from large amounts of cherries.
 Recommended ⇒ 11 Ways How I Use Wax Paper In My Kitchen
Technique:
1. Place the fork under the cherry pit and pull the pit with the fork out. If the pit does not come out easily, I rotate around the pit fork a little to release the pit and then pull the stone.
 Recommended ⇒ 15 Ways To Use Aluminium Foil In The Kitchen
4. Cherry Pitter Out Of Wire Paper Clip
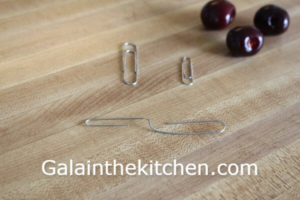
Wire paper clip is a great DIY handmade tool too to remove cherries’ pits. No time to make it, just unbent paper clip as I show in the photo! Choose a larger wire paper clip around 2 inches long because smaller 1.5 inches can easy to bend and do not work well, especially for large amounts of cherries. This method works for sweet and tart cherries as well because we can easily adjust the loop for smaller cherries.
*My friend told me she made a handmade cherry pitter from a hair bobby pin. I didn’t try it myself to test one but it can work too, so I mention it.
Downside: My hand tired faster than tools with longer and stronger handles. Definitely not for large amounts of cherries for me.
Technique:
1. Push a paper clip into the cherry next to the cherry stone. Rotate the clip to release the cherry stone from the cherry flesh. Pull the paper clip with the seed.

 Recommended ⇒ 4 Cute Raspberry Garnish Ideas With Photos
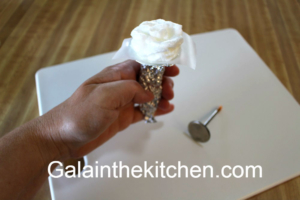
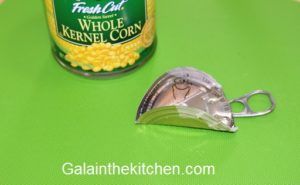
5. Pit Cherries With A Funnel
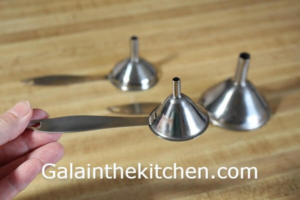
Look around your kitchen and will be surprised what we can use to pit cherries! I have a set of 3 funnels with handles for different sizes of bottles, I bought it at Walmart. And surprise! The smaller funnel works just perfectly to remove the pit out of cherries! This is a great cherry pitting tool because we have multiple uses for the tool and don’t have to buy a fancy cherry pitter. If we don’t have a cherry tree in the yard, the funnel works great to pit cherries.
Downside: Not everyone has an available small funnel at home. The juice will be around the tool and we need something to absorb it.
Technique:
1. Cover the surface with a paper towel to absorb the juice and prevent sliding. Place the cherry where the stem was attached down. This way will be less damage to the cherry.
*It is not for every tool rule. The reason the top of the funnel is sharp is not enough to make a perfect cut and damage the cherry more if we place the bottom of the cherry on the funnel.

2. Press the cherry and the pit will be on the top.
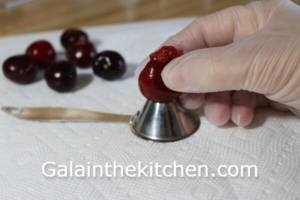
3. Remove the pit. How easy to get cherry pits out with a small funnel!

 Recommended ⇒ 9 Substitutes Ideas For Baking Tools And Equipment
6. How To Pit Cherries With A Metal Pastry Tip

The technique to remove the cherry pit with a metal pastry tip is good and simple but cherries are often split in half if I was not careful. A rounded piping tip works the best to remove pits from cherries. I tested myself with my old different piping tips this method and I suggest don’t use piping tips to make design, for example, the star tip. The reason is other piping tips very easy to bend the top and damage it, so it will be impossible to use for pastry decoration after.
Downside: Cherries are often split in half.
Technique:
- Place the cherry on the top of the pastry tip and push the cherry.

2. The cherry stone will be on the top of a piping tip and it easy to remove.
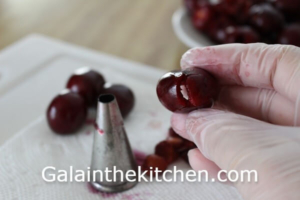
*Less damage to a cherry will be if we place a cherry on the pastry tip where was a stem.
 Recommended ⇒ 15 Uses For Plastic Wrap In My Kitchen
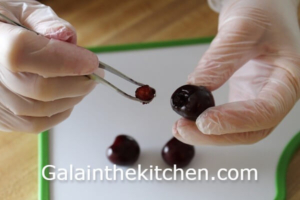
7. Cherry Pitter From Tweezers
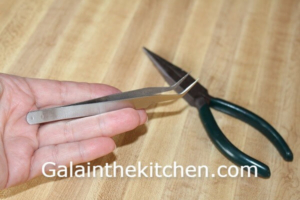
The idea to make the cherry pitter from cosmetic tweezers I found online and thought it will work so well. I just bent the tips on both sides as you can see in the photo. In my opinion, it can work well if you have strong hands. I am not strong enough to pull the stone without twisting the tweezers. This cherry tool definitely does not work for me well.
Downside: Need to have strong hands to make this tool works well. Not work for large amounts of cherries.

Technique:
- Hold the cherry with one hand and place the tweezers under the pit. Slightly wiggle and pull the pit out.
 Recommended ⇒ How to Make Easy Channel Knife Yourself For Beginners
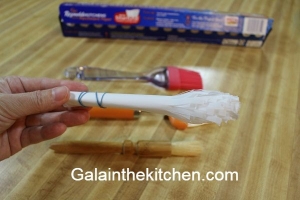
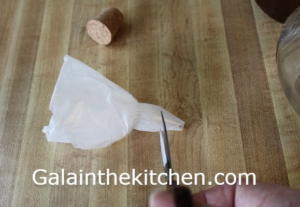
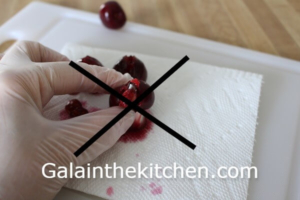
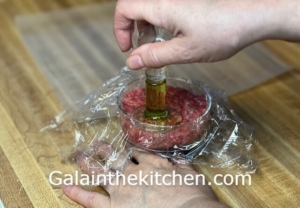
8. How To Remove Pits Without Gloves
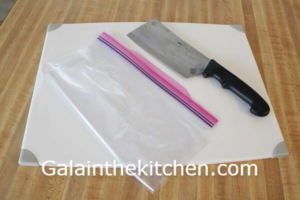
Smashing cherries on a cutting board with the side of a knife to remove pits I saw on YouTube presented by one cook. In my opinion, it will be too messy, if I follow exactly his direction. How do you pit cherries without making a mess with this method? Use a ziplock bag! And it works! Everybody has a knife and plastic bags at home. The technique will work for you if the shape of the cherry doesn’t matter. No messy fingers and no gloves with this method because we don’t touch pitted cherries directly. Check, this technique, it may work for you.
Downside: Cherries lose a lot of juice. The shape of the cherries is not presentable.
We Need:
1-gallon storage plastic bag
Knife with a wide blade
*Instead of a knife you can use a plate or other objects as well.
Technique:
- Place cherries in the bag. For me works the best 3-4 at a time. Place a wide knife on the top as I show in the photo and hit with your hand.
*Don’t worry the knife doesn’t smash completely the cherries because cherry stones will stop the knife.

2. Push the cherries stones out of each cherry to one corner of the bag and cherries without a stone to another. I emptied the bag after pitting 25-30 cherries. I empty the bag by holding the stones with one hand on the outside of the bag, so the stones do not mix with my pitted cherries.

*I tried placing my cherries differently but no matter what I did the stones did not come out after smashing. I have to push out pits one by one out of the smashed cherries. However, no gloves are required.
 Recommended ⇒ 9 Easy Strawberry Garnish Ideas
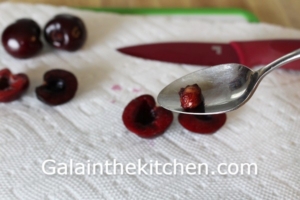
9. Remove Pit Out Of Cherry With Knife And Spoon
To remove cherries pits I used a knife and spoon in this method, these garnish tools every kitchen has for sure. It works well if we want to use halves of cherries for garnish. The cherry halves are so presentable and a great look on any dessert!
Downside: Time-consuming method to pit cherries.
Technique:
- Cut in half cherry with a paring knife. Twist the cherry and one half comes out easily without the pit.

2. Use a small spoon or other tools I mention above to remove the pit out of another cherry half.
 Recommended ⇒ 11 Uses of Vegetable Corers in My Kitchen With Photos
10. My Cherry Pit Remover By Zyliss
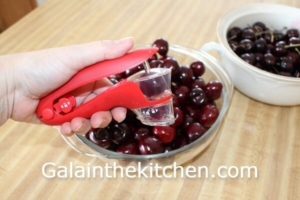
I am happy with my Zyliss cherry pitter, which I bought a few years ago. I will share my experience with my cherry pitter and useful tip, which I learned just recently. It is not the first cherry-pitter in my life but definitely the best so far! The pitter has an adjustable guard on the top and it is nice to have. However, the removable small container to collect pits on the bottom has no use, in my opinion, and I always remove it when using my cherry pitter. The reason, it holds a few pits inside, and no reason to empty it after a few cherries. Other than that I can call my Zyliss cherry pitter perfect.
Check out ⇒ My Kitchen Tools and Gadgets

The Best Way To Place Cherry In Pit Remover By Zyliss
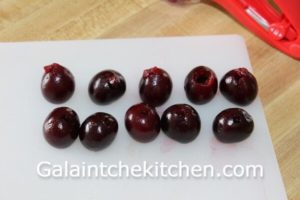
I placed my cherries in the pitter where the stem was because thought this is the best way and the fruit has less damage but one day I tried the opposite placing for my cherry. I was so surprised if we place the cherry bottom up, the fruit has less damage! So, if you have a factory-made pitter always try both ways to place a cherry in and you find the best way to make less damage to the fruit.

The result you can see in the photo below. The top line with the most damage is when I placed cherries with stems up and the bottom line of cherries is the result when I placed cherries upside down.
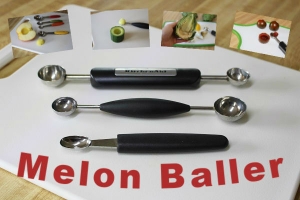 Recommended ⇒ 15 Ideas With Photos How I Use Melon Baller
11. Review Quick Release Multi Cherry Pitter By OXO

I bought a quick-release multi-cherry pitter by OXO because of the great reviews on BethBathandBeyond.com and tested it on sweet cherries a few times when preparing my cherries for freezing. I have a double feeling about this tool after testing myself. The tool idea is good and we can pit up to 6 cherries at a time and we save a lot of time. Much faster process than trying to remove each pit separately. However, when I start using it, my cherry pitter works not smoothly as I thought!
Pros about OXO multi cherry pitter:
- We can pit 6 cherries at the same time.
- Can fit different sizes of bowls to place.
- Easy to clean kitchen tool.
- Dishwasher safe (I avoid placing it in the dishwasher but some people may want it)
- Doesn’t take up much space in the kitchen.
- Well constructed and looks like will work for a long time to me.
- BPA-Free kitchen tool.
Cons:
- Holes are small for some large pits of cherries.
- Pits from time to time get stuck to the cherry and stay attached to the fruit.
What issue do I have with the OXO multi-cherry pitter?
The device is difficult to use for cherries with large stones. Stones don’t come through the holes and make the pitter impossible to use.
Tip For Multi Cherry Pitter By OXO
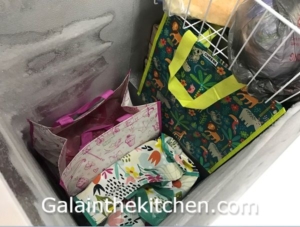
On the box note, “Easy-to-access tray catches pits for up to a pound of cherries at the time.” I don’t think it is possible for a large number of cherries, at least the cherries I had. I improved my Multi Cherry Pitter By OXO. This extra step to empty the tray is absolutely not necessary if we replace this tray with a plastic bag as I show in the photo. Another solution is just when you are ready to push cherries into the bowl use a different bowl to collect pitted cherries.
*Inspect cherries for stones after each release by pressing on them with two fingers. The reason is that sometimes seeds are stuck to the skin but it is not easy to see without touching the cherry.


My personal opinion about my OXO multi-cherry pitter is from using it for different sizes of cherries. The idea is good if I have perfect cherries for the tool. It definitely, should be improved. I wish the holes were slightly larger for the cherries I tested or has another attachment for different sizes of stones and I can able to use them on any size of cherries seeds. I definitely can recommend it to the person who has a cherry tree in the garden and the size of the cherries is predictable. Do I keep it? Yes, I keep my cherry pitter because it is handy to have for smaller cherries (I buy cherries from the market). When I pitted 6 cherries at the time it speed up the process a lot.
 Recommended ⇒ How to Make an Easy Channel Knife – Garnish Tool
In the photo below I made a fun tiny bunny out of cherry. Cherry for younger kids is better to serve without the stone.

⇓ Check Out My Other Recipes ⇓


 @Galainthekitchen.com
 @Galainthekitchen.com