
⇓ Watch Video ⇓
The Secret to Juiciest Pan-Fried Chicken: The Parchment Paper Method
Are you tired of dry, tough chicken breasts? We’ve all been there! Today, I am going to share an amazing technique that will change the way you cook forever. I’ll show you how to make a perfectly seasoned, incredibly juicy pan-fried chicken breast every single time. The Secret Ingredient? Baking Paper! It might sound surprising, but the secret to the most moist chicken breast isn’t a fancy marinade or expensive equipment—it’s simple baking paper (parchment paper).
By cooking the chicken inside a layer of paper, you create a “mini-oven” inside your frying pan. This protects the delicate meat from direct, harsh heat while locking in all the natural juices and salty steam. The result is a golden-brown exterior and a tender, succulent interior that practically melts in your mouth.
Why You’ll Love This Technique:
-
Zero Mess: The paper keeps the splatters inside, making cleanup a breeze.
-
Perfect Seasoning: The salt and spices stay pressed against the meat instead of washing away in the pan.
-
Foolproof Results: Even if you aren’t a professional chef, this method guarantees a “perfect every time” result.
Give this method a try in your kitchen today! I promise you will not be disappointed!
📸 See the Results for Yourself! Scroll down to the bottom of this page to watch the video. You’ll see exactly how moist and glistening the chicken looks the moment I take it out of the paper. You have to see it to believe it!

Ingredients:
1 boneless skinless chicken breast
1/2 teaspoon any poultry spices
1/4 teaspoon thyme (I use fresh)
Salt and black pepper
2 tablespoon corn starch
1 tablespoon softened butter
parchment paper

*Baking paper can have different temperature limits. I used Reynoldskitchen’s Parchment baking paper in the photos. The temperature limit is 420°F. A higher temperature limit is much better for this technique.
 Recommended ⇒ 12 Ways To Use Baking Parchment Paper In The Kitchen
Frying Pan Tip
Better to use a thin skillet or frying pan for frying on baking paper. When the temperature is higher than we need, we need to be able to reduce heat very quickly. I use an inexpensive coated cooking pan and so far it works great for this task. Remember most coated skillets not recommended to warm up empty without oil or butter. I suggest don’t use an expensive, nice coated skillet for this job because we don’t need the benefit of a non-stick frying surface.
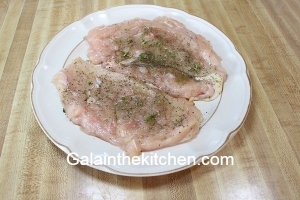
- Place chicken breast in plastic wrap or inside a plastic bag. Pound chicken breast with the flat side of a meat mallet until about 1/2 inch thick.
Instead of a meat mallet, we can use a rolling pin or skillet.

2. Add spices, salt, and herb on both sides of chicken breast.
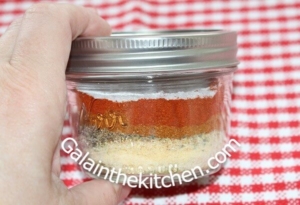 Recommended ⇒ My Favorite Cajun Seasoning Mix Recipe
2. Add on both sides of chicken breast corn starch. Then I spread butter on parchment paper and make my own butter paper. Place chicken breast on it.
Corn starch helps to keep chicken juices. I tried without corn starch and much more juices will be on baking paper. I tried without butter too but butter gives a nice flavor to chicken and improves the taste of the meat.

 Recommended ⇒ Pan-Fried Salmon Without Oil Or Butter On Baking Paper
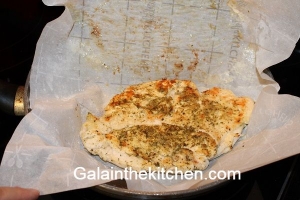
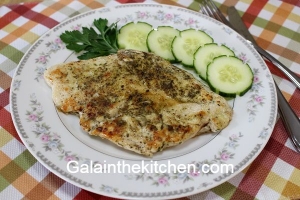
4. Place chicken breast on one side of parchment paper and cover with the other side like a book. Warm up the skillet on medium heat. Place chicken in the baking paper on the hot pan. The baking paper should cover the top of the chicken breast. Fry on each side approximately for 5 minutes or more. Cut chicken breast and check doneness. Let meat “rest” 3-5 minutes before serving.
Flavorful, moist, and tender chicken breast is ready to serve!
*Precut baking butter paper already with spices on it is available at grocery stores in Russia, my sister told me. On the package note, “Moist Chicken Breast Every Time Without Butter”. She tried to cook chicken breasts in pre-made flavored baking sheets, but was not impressed. However, she likes to make her own flavored butter sheets and fry chicken breast this way.

Video Super Moist Pan Fried Chicken Breast In Parchment Paper
Fun Way To Serve Chicken Sandwich For Kids
This pan-fried chicken breast is incredibly versatile. It’s perfect sliced over a fresh salad, tucked into a sandwich, or served as a main dish with mashed potatoes and seasonal vegetables. To make it extra special for the kids, I turned my chicken sandwich into a “Louisiana Gator Sandwich”! We live in Louisiana. I garnished it with a ‘pickle alligator’ holding an olive in its mouth, using sunflower seeds for the eyes. It’s a simple, playful way to make lunch memorable.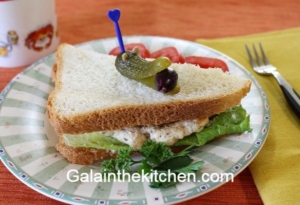

⇓ Check Out My Other Recipes ⇓
 @Galainthekitchen.com
 @Galainthekitchen.com

 @Galainthekitchen.com
 @Galainthekitchen.com
 @Galainthekitchen.com
 @Galainthekitchen.com
Leave a Reply
Want to join the discussion?Feel free to contribute!