
Russian Farmer’s No Knead Bread Recipe With Instant Dry Yeast
This simple no-knead bread is so easy to make. The recipe was shared on YouTube by a Russian farmer. Farmers are so busy and don’t have time for fancy and complicated recipes. This recipe requires not much effort and no kneading is needed. A great bread recipe for a beginner. For this recipe, we need just time for proofing. The best is to make the dough in the evening and bake in the morning. I keep trying so many recipes with yeast and with the homemade starter as well and this is the first recipe I want to share on my website. Before sharing the recipe I tried it a few times and every time I was satisfied. This bread is so good to serve with a bowl of homemade soup! It is a type of artisan bread.
What we need to know about bread making as beginners. Flour can have different moisture and quality and bread come out differently from different flour. I am going to share so many details and tips. Great to have a scale.
*I tried a few recipes with a short time rise for a few hours and was satisfied. The texture is great and the bread comes out beautifully but the taste of yeast is noticeable.
 Recommended ⇒ 9 Substitutes Ideas For Baking Tools And Equipment
The direction of how to make this Russian farmer bread is detailed but it is a very easy recipe. In just a few simple steps we can make a great loaf of bread.
- Mixing and 12 hours rise
- Shaping
- Final rise
- Baking bread
- Cooling
Why Do We Need To Sift Flour Before Use In Bread?
Why necessary to sift flour? It is always beneficial to sift before use for any pastry, include flour for sauces. Why? Flour enriches with air when we sifting. After sifting some flours (depends on brand) I see tiny flour balls on the bottom of sifter. I continue sifting and balls brock down and became flour again. This simple step makes ingredients incorporate much more easily with each other and definitely to increase the quality of your product. Just remember flour likes air and don’t miss this important step. Another reason to discover foreign objects in flour before making the dough. This reason may be to apply more for the old days.
 Recommended ⇒ Fun Hot Dog Buns Shaped Like Dogs. Kids Party WOW
Ingredients:
350 g (2 3/4 cup) all-purpose flour
50 g ( 5 tablespoons) whole wheat flour
300 – 350 g (400 ml or 1 2/3 cup) water
10 g (1/2 tablespoon) salt
2 g (1/3 teaspoon) instant dry yeast

- Mix all dry ingredients well with a whisk or other tool. I have 10g pink salt.
Better to use coarse salt ground yourself because coarse salt without anti caking agent. Flour should be sifted.

2. Add 300g water room temperature at first. If the mixture has patches of flour, keep adding more water by a small portion no more than 350g. The dough should be able to keep the ball shape but at the same time sticky. No kneading the dough, just mixing!
Water better use from a bottle or filtered. Very convenient to mix up all ingredients in the evening before going to sleep and cook in the morning. I use the oven without any light or heat to proof dough.

2. The dough will be very bubbly and happy and twice in size. The dough is hight moisture. The first rise is successful.

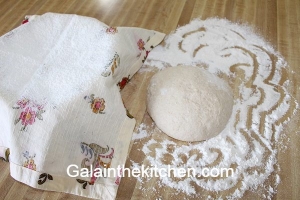
3. Dust very generously table with flour and place dough on the table. Stretch dough in the rectangle shape. Fold in 3 times. Then fold in 3 or 4 times in a different direction.


4. Shape a ball from the dough, so one side is smooth. Place the cloth on the top of the basket and sprinkle generously with flour. Then put the dough ball on the top napkin and cover it.
Placing the dough in cloth and basket is beneficial for the crust. The dough dries out slightly in a cloth and basket because air is flowing around.
Recommended ⇒ 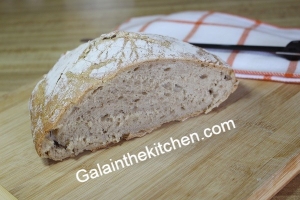 9 Simple and Important Tips For Making Bread At Home
5. Leave the dough for 1-hour final proofing at room temperature.

6. Turn the basket upside down and place the dough on the baking paper. Score the bread on the top, so our dough extended in the way we want.
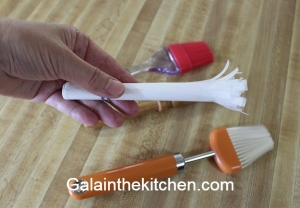
Choose simple scoring bread design, if you beginner. The design should take a few seconds, so the dough is not going to deflate. For convenience to make a design we can use turnable Lazy Suzi. It is not everybody has at home. Check my cake decorating tools substitutes page and you might find great substitutes ideas for turnable. The simplest one is a microwave plate.

7. Bake bread in the oven at 430°F with a steam on the bottom 20 minutes. Remove the tray with water and bake 25 minutes more.

*We can also use a Dutch oven with a lid on it. Place Dutch oven in the cold oven and heat it up. Place bread inside and cover with a lid. After 20 minutes remove the lid and continue to bake bread 25 minutes more.
 Recommended ⇒ How To Peel Almonds And Make Almond Flour
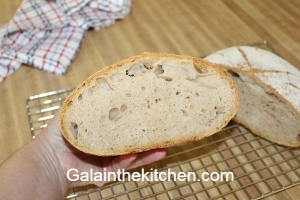
9. Cover bread with a towel and let rest for 20-30 minutes before cut it. Bread has a great crust and after hours will be softened outside.
I know my bread is done by appearance and fully baked bread sounds will be hollow if we knock on it. Also good to give an additional test by a wooden toothpick. If the toothpick comes out dry my bread is done. If it slightly wet I give a few more minutes.
Homemade bread doesn’t have preservatives and great for our digestive system!
 Recommended ⇒ How to Make Butter Garnish Flower And More
Old Fashion Ways How To Store Homemade Bread
The best way to keep homemade bread in a linen (cotton) bag. Bread will be breathing in the bag and also linen is the naturally antibacterial fabric. Another old fashion bread keeper is a pot with a lid. If the lid is too tight and not much air coming in, just place something between the lid and pot. Ziplock bag is OK to keep bread too but I don’t seal it completely, so the air coming in. Avoid any condensed water around bread!

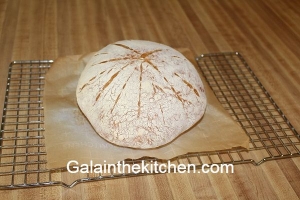
Every time I make this recipe, the bread comes out slightly different. In the photo below, the same recipe. The reasons can be many, including flour quality, temperature, and humidity in the kitchen.
How I Decorate Bread With Beautiful Flowers Design
This is my first attempt at this decorative bread technique, and I love the results! The design is applied before baking, using a simple, effective flour-dusting method. This simple technique elevated bread presentation!
Here is how I did this design:
- I covered the area around the design with foil to keep the flour where I wanted it. Check the technique of how I attached foil (with video) ⇒ Impressive Plating Technique Idea With Stencils
- I placed my flower template on the dough and lightly sprayed the surface with water.
- Then, I dusted flour over the top—the flour stuck to the damp areas, revealing a stunning pattern once baked!
Check out the results in the photo! Have you tried decorating bread this way? Let me know your tips!
*In the photo, a different bread recipe.

 Recommended ⇒ 5 Easy DIY Cookie Cutter Ideas Out Of Plastic Bottle

⇓ Check Out My Newest Recipes ⇓


 @Galainthekitchen.com
 @Galainthekitchen.com
 @Galainthekitchen.com
 @Galainthekitchen.com
Leave a Reply
Want to join the discussion?Feel free to contribute!