
9 Ideas Substitutes For Baking Tools And Equipment
On this page, I am sharing the best substitutes for baking tools. All ideas I try myself and tell my opinion. Some ideas I found on the Internet some from life experience. Just recently I start learning how to make bread and some tools and equipment I don’t have. So, I am going to share also how I replace these tools for bread making. Great to know these alternatives if you beginner baker. Maybe before buying fancy tools, check your kitchen and you might find something instead. In some cases, some baking tools are not a necessity to have if we bake seldom.
On the page:
- A flour sifter substitutes and flour tips.
- What we can use instead of a rolling pin. How to make a custom pin 1 yard long.
- How to make a basting brush yourself.
- Egg separator alternative.
- Tools for scoring bread dough we can use instead of a lime.
- Bread proofing box alternative if cold outside.
- A peel baker tool substitute ideas.
- Bread proofing basket to shape boule substitutes.
- Baking paper substitute.
 Recommended ⇒ 11 DIY Ideas Tools For Cooking And Baking
1. How To Sift Flour Without A Flour Sifter
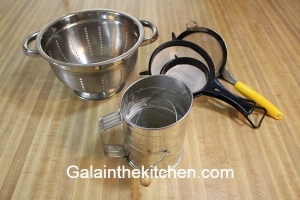
The best substitute for a flour sifter is a strainer with a fine mesh. If you don’t have a sifter, use a colander. A pasta colander is a great flour sifter substitute, too, it helps to enrich flour with air and catch some lumps.
Another substitute for a flour sifter is a large plastic bottle if we make holes in the bottom. It’s more for a camping tool solution. Super easy to make!
A few words about my experience with the sifter in the photo above. Takes less space compared to the old-fashioned ones I had. One thing I don’t like about it if I compare it to the sifter in the photo below. I have to use both hands when I need to sift flour with my sifter. I need to hold it with one hand and rotate the handle with the other hand. I learned it is not always convenient. Another sifter (the photo below) looks almost the same as the sifter above but has a different construction. The sifter has a double handle, and we sift when holding it with one hand. I have both. The sifter in the photo above can work forever because it is so simple. I have had my sifter for over 10 years. Double-handle flour sifter takes much longer to sift flour, and I use it very seldom, definitely not my favorite.
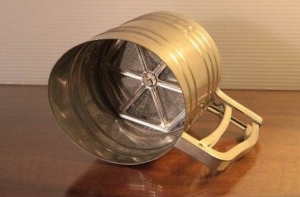
⇓ In the photo below, a is a double-handle flour sifter ⇓
The Best Way To Store Flour Sifter
The best way to store flour sifter is in a ziplock bag. The gallon ziplock bag works great for the sifter. I practice it for so many years, just change bags sometimes. I don’t wash sifter after each use, just shake flour off before storing it in a bag. We can store in a ziplock bag safely without any problem as long we don’t get moisture inside the bag. I always use my flour sifter with dry hands. A tiny drop of water can make a problem and bacteria or fungus can grow in the bag, especially if we don’t the sifter for a while. I don’t want to go far in microbiology but basically where is water will be growing life and this fact everybody knows. The same reason why important to keep flour and grains dry.
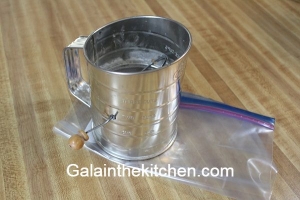
As you can see the flour sifter fits great in a one-gallon ziplock bag.


Do We Have To Sift Flour Before Using It?
Yes, we do! I see on YouTube a blogger tells us not to sift for the recipe of his cake. It doesn’t matter which recipe we are making; classic baking rules are better to follow because it is based on many hundreds of years of experience. Sifting flour before use improves the quality of the final product.
- It is very important to enrich flour with air before use in baking goods.
- Another reason is to remove lumps in the flour. Fresh flour can have small lumps because it is stored in a humid environment. It makes it easier to incorporate ingredients.
- With modern flour, we don’t have to worry about objects in the flour, but it’s still a good idea to sift it anyway. For example, a small piece of paper from the package.
Recommended ⇒ 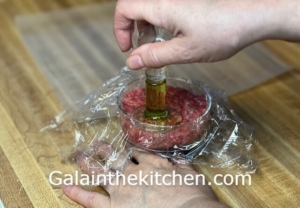 15 Ideas How To Use Plastic Wrap In The Kitchen
2. What To Use Instead Of Rolling Pin?
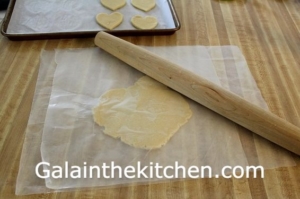
The best rolling pin substitute is a glass bottle. It can be a wine bottle or mineral water bottle as long as the bottle has straight sides. As you can see, I have 3 rolling pins in my kitchen and still kept a bottle of mineral water for a few years now. For some jobs, my bottle works better than any rolling pins and easy to clean if the dough sticks to it. If you don’t have any of these options, we can use a tall drinking glass in a cylinder shape or a flower vase in a cylinder shape. It can work great to roll out cookies, for example.
*I really cooking tools and gadgets collector! Read more ⇒ My Kitchen Tools and Gadgets
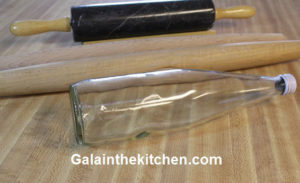
How To Make Custom Size Rolling Pin?
We can buy from home improvement wooden dowel and ask to cut the right size. Handle for a shovel as an example and it has the right size. A great idea if we need a custom size rolling pin too. For some great pastries, we need a very long rolling pin like a yard long. We can’t find it at most stores for kitchen supplies.
 Recommended ⇒ 7 Simple and Important Tips For Making Bread At Home
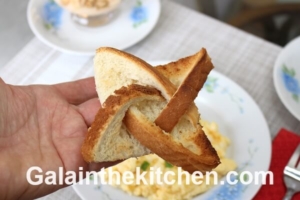
3. How To Make A Basting Brush Yourself
A quick substitution for a basting brush is making a brush out of a baking paper. The paper baking brush is heat resistant and food-grade material, so safe to use for any food-related jobs. I have myself a few basting brushes but love this disposable substitution idea. The most problem I have with factory-made busting brushes is cleaning after each uses with butter. Not much to do with a brush but not easy to clean manually after. For good clean up my brushes, I always have to run them in the dishwasher. So, I was looking for an alternative to use something instead of a basting brush for a small job. When I saw the DIY idea on how to make a quick substitution for a basting brush I give a try. I used my handmade disposable basting brush to brush garlic herb sauce onto hot biscuits for the first time. It works great for me!
If you don’t have a basting bush – make one! I can’t say it is better than brushes I have but definitely works for the task. The brush made out of baking paper is a great alternative instead of a busting brush when we need it. The direction to make it is so easy.
- I cut off a stripe of baking paper approximately 12″ (you see how big you need your brash)
- Fold in half vertically. Fold in 4 times horizontally.
- Cut the bristles on the bottom. Unfold and roll into the brush. I secure it with a rubber band.
Here are a few more basting brush alternatives I am going to mention.
1. Making a brush from the paper towel. I was using a paper towel instead of the busting brush to try but it not great because inexpensive paper towels not strong enough and absorbed a lot of butter. Paper towels made to absorb and hold liquids. However, if we have to use it is ok.
2. Brush from greens. Maybe it can works great for example from rosemary branches. Another benefit it the flavor from the herb. I like the idea but didn’t try myself yet.
*Old fashion kitchen brush for egg wash, what my grandmother used in her kitchen. Brush made out of chicken feathers from tail long ones. I don’t know how she prepares it to make brushes but I clearly remember how her homemade brushes look like. I remember she was adding eggs on buns and pirozhki.
*Russian old fashion way to grease pan for pancakes is to place on the fork pickled pig lard. Use after each pancake.
Recommended ⇒ 11 Ways To Use Baking Parchment Paper In The Kitchen
Can We Use A Paint Brush Instead Of Kitchen Brush?
We can if we have to. I used paintbrushes from the hardware store in my kitchen in the past. I don’t like it because it was losing bristles so easy and I always have to watch for it. Another reason I don’t like, I can’t put it in the dishwasher. Especially, after using a brush on butter, hard to clean well. Just invest in a kitchen brush they are an inexpensive and most important food grade tools.
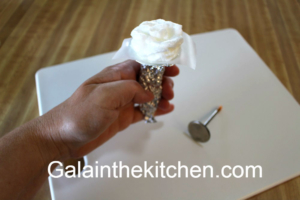
4. Egg Separator Alternative
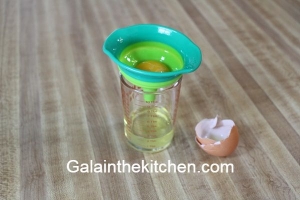
So many egg yolk separators on the market! However, we can find a great alternative for it in our kitchen and don’t spend money on an extra kitchen tool. An egg separator is easy to substitute for a funnel. The funnel with a 1/2 inch opening on the bottom works just great if we need to separate egg yolks from whites. If egg whites not coming easily from the opening of the fannel, I help with a spoon. Just be careful don’t damage the york.
My Personal Preferences To Separate Egg Yolk From White Most the Time
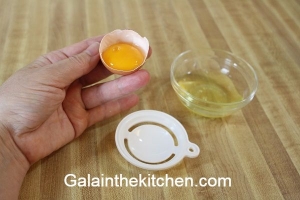
I have an egg yolk separator because of receive as an addition to some purchase. Do I use one? No. The reason is just personal preferences. I like to use the old fashion way technique to separate the egg yolk from whites most of the time. I use half of the eggshell to catch the yolk. In my opinion, it is the best way to separate the egg yolk from whites. Easy and I don’t have to wash additional kitchen tools! However, from my experience, this method not always works well with every york, some yorks so fragile, and egg separator or fannel is the only way to go.
* Eggshell great to catch small pieces of shell in the egg too.
My family member asked me: “Can we store eggs at room temperature on the countertop?” My answer is “NO”. With the Internet, we can see all this nonsense advice, and some people believe it! Store eggs only in the refrigerator; don’t leave them on the countertop.
*According to the ServSafe coursebook, the temperature to store eggs should be 45°F ( 7°C ) or lower.
Wash Or Don’t Wash Egg Shell Before Use It?
We don’t need to wash eggs before storing them because eggs are washed and sanitized at the packing facility. However, I prefer to rinse my eggs with warm water before use. Never wash your eggs with any chemicals because the eggshell has tiny pores and chemicals can get inside the egg.
 Recommended ⇒ The Ultimate Guide Of Making Homemade Mayonnaise
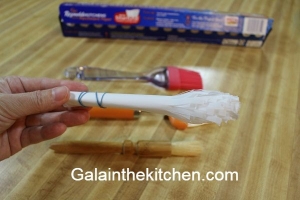
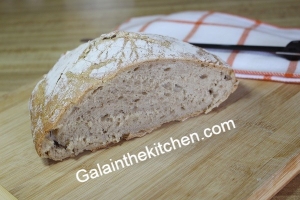
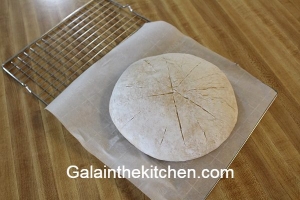
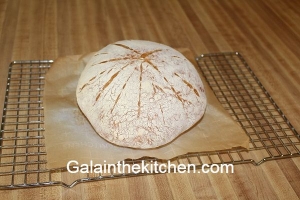
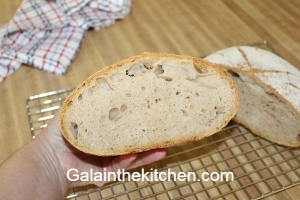
5. Lame Bread Dough Scoring Knife Alternative
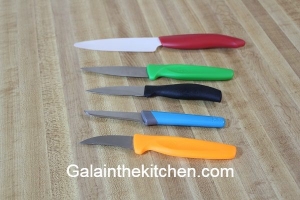
Bakers use a laser blade with a handle to score bread that calls lame. I don’t have one, so I am going to share how to score bread without a lame. I start looking for alternatives and found two great lame substitutes in one in my kitchen another one in my husband’s garage. I am in the process of learning to bake bread and not ready to invest in real bread baking equipment. We still need a lame tool and fine blade for fine artistic scoring. These ideas are more for beginners bakers. The first one is my carving knife. I have so many in my kitchen but with a curve, the carving knife works the best for me. In the photo above carving knife is with an orange handle. Good plastic blade knives work great too because they are so sharp and the blade is very thin compared to my metal knives. However, with a large knife so hard to make a design. The best, of course, work a laser blade. So the next relatively inexpensive option I found in my husband’s garage.
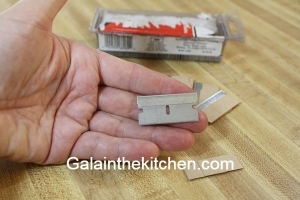
Another lame alternative is razor blades with a single edge from hardware stores. I saw them at my husband’s garage and he said these blades are used by car detailers and he has a pack of them. Using for so many years because 100 in the pack :), cost around $10. I washed well before use, of course. I like it because it has one edge only sharp and relatively safe to use. Maybe not fine as real razor blades but still a great substitute for a beginner for bread making!
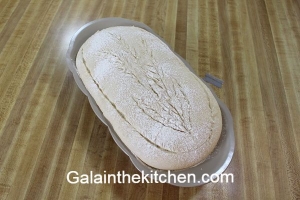
On the photo below my bread decorated with a car detailer razor blade.

If we don’t have a lame for bread scoring we can use any sharp tool we can find in our kitchen. Actually, we can use even kitchen shears to make flower-like bread. Just be creative!
Recommended ⇒ How To Make Fun Cookie Shapes Without Cookie Cutters
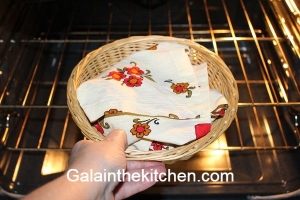
6. Bread Proofing Box Alternatives If Cold Outside
We have very warm weather and the sun is the best alternative for bread proofing boxes in our subtropical climate. However, when I start making bread in the evening and the cold air blew from the air condition, it was time to look for other alternatives than the sun to proof bread dough. The professional baker suggested the bread proofing box. It is a great solution for people who have a large kitchen and make bread very often but not for bread-making beginners like me. So, I am going to share a few ideas on how we can substitute the bread proofing box.
*On some recipes we need a warm environment on some we don’t. However, so important to know – yeast can be killed by high temperatures. I always follow the rule, if the environment is comfortable for my hands it will be comfortable for my dough.
1. Oven
Bread dough speedy and overnight proofing in the oven is traditional and well known. It is a perfect substitute for a proofing box! Just one thing. For overnight no problem. However, for speedy proofing, the oven is not always available in the day time.
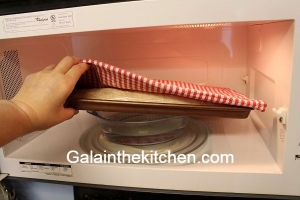
2. Microwave
Microwave is great for speedy bread proofing. I tried with hot water in a glass dish under the bowl with the dough. Downside – the heat is going only from the bottom. Also, if someone from the family needs to use it, I have to take it out.
3. Heating Pad
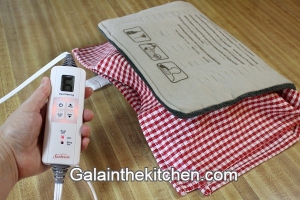
My favorite nontraditional speeding method for bread proofing to use heating pod. Just place a towel around the bowl (should be covered with plastic first) and set the temperature you prefer, I have settings of 6 and usually use 3. My heating pod off in 2 hours automatically but I always keep eyes on it. You not going to kill the yeast with this method by overheating the dough. I used heating on 6 and my bread dough was just fine.
*My heating pod is 12″ x 24″ size and covers the top and the bottom at the same time.
What to consider if you do proofing with a heating pad!
1. Cover up with plastic and towel the bowl or bucket where is the dough. If dought escape, it possibly can ruin your heating pod, and also it can be dangerous because it not design for wet dough proofing.
2. Don’t use it without looking every 30 minutes on it. I had a situation when I caught just in time my dough. :)
Other than that, I like it!
4. Some Food Dehydrators
A square shape food dehydrator is perfect for dough proofing as well.
5. A Seed Germination Mat
Another nontraditional If you are a gardener and have a seed germination mat – use it! I never use one but heard for bloggers it is a good solution too for speedy dough proofing.
![]() Recommended ⇒ 5 Easy DIY Cookie Cutters Ideas Out Of Plastic Bottle
Recommended ⇒ 5 Easy DIY Cookie Cutters Ideas Out Of Plastic Bottle
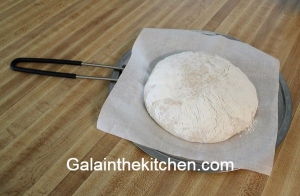
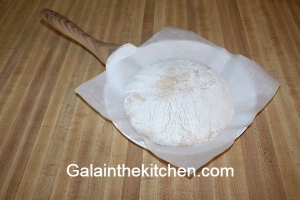
7. A Baker Peel Tool For Bread Substitutes Ideas
A peel tool for bread looks like a shovel and works great to put bread, pizza, or other baking goods in the oven. I really need it when I was making very high moisture artisan bread and it was a large loaf. The bread was on a baking paper but I can’t handle it because of the size of the bread. I really miss a pizza peel tool. However, I am not a baker to buy this tool for a few time use, so I start to look around my kitchen. Here is what I found and going to share with you. This alternative for a peel tool works great if our bread has a baking paper on the bottom.
1. Splash Stopper As Alternative
A splash stopper is good to use too if we have the right simple one like on the photo.
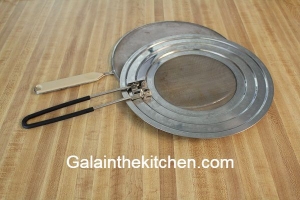
2. Stainless Steel Baking Rack Alternative
I have a long stainless steel baking rack and it works great as a peel tool substitute for me. Long enough and almost flat surface. Safe with very high temperatures. It is the best bread peel tool substitute option in my kitchen.
3. Crape Pan As Substitute
A crepe pan is great too. The pan should have a low height so we can slide the bread out easily from the pan to the oven.
4. Cutting Boards
A cutting board, if it is long enough and has a long handle, just a perfect substitute. However, plastic can work too, if it is thin and rigid. Just take bread from the oven for a minute on it. To protect from heat we can cover it with foil. I found in my kitchen just a few substitutes but I am sure if I look more I can find more in your kitchen.
 Recommended ⇒ Plating with Stencils: A Clever Foil Covering Technique
8. Bread Proofing Basket To Shape Boule Substitutes
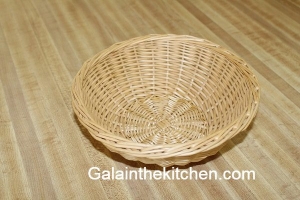
Nice to have a proofing basket for bread but what to do if we don’t have one. What we can use instead of proofing baskets? The best substitute for boules shaped proofing basket is a simple wicker basket because it has a pattern and lets the airflow. It is very beneficial for the bread crust. The basket is shaping the dough as a mold for the final rise and let it dry slightly outside before baking. I found the basket at home and use it for my bread proofing. The next option for proofing basket substitute is a colander. Colander has holes around and lets also the airflow.
Other options are simple. For the final rise, we can place dough on plastic bowls, glass bowls, pots. It works great too when I tried.
 Recommended ⇒ How To Make Pinwheel Toasted Bread Cups
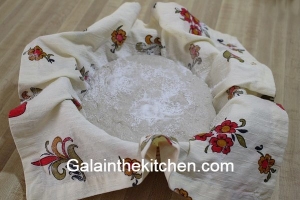
Tip How To Load Bread In Proofing Basket
This tip is simple but very useful. To cover the dough with flour even in proofing basket we need to do just a simple step. Cover the basket with cloth evenly but don’t push it inside the basket with hands. Sprinkle with flour cloth and then place the dough in the basket. This way flour will be even around the dough. If we push cloth inside before placing the dough flour covers bread not evenly, mostly on the bottom.

9. The Best Baking Paper Substitute
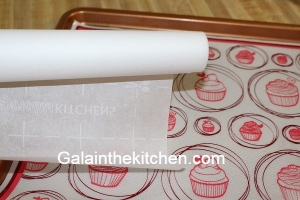
The best baking paper substitute is a non-stick baking mat or also call cookie sheet liner. The baking mat is great to use to bake cookies and other baking goodies. My baking mat has a much higher heat resistant max temperature (MAX 600° F) than any baking paper. Some baking mats have lower heat resistants temperature than my but it still worth buying it. The baking mat is reusable and if you bake often nice to have one.
 Recommended ⇒ 13 Ideas How To Use A Crinkle Cutter To Garnish Food
Tip
Wash off sticky dough from your mixing bowl or other dishes with cold water instead of warm. With cold water will be much easier to wash off dough from the surfaces.
 Recommended ⇒ How To Make Easy Heart Design On Toast With Foil


 @Galainthekitchen.com
 @Galainthekitchen.com
 @Galainthekitchen.com
 @Galainthekitchen.com
Leave a Reply
Want to join the discussion?Feel free to contribute!