
5 Useful Tips How To Organize A Small Chest Freezer

We live in Louisiana, the USA, and in hurricane season, we don’t know what to expect, and it is better to be prepared. I had an upright freezer in the past, and it is great for accessibility and the ability to find food in it. However, the chest freezer is better for freezing performance, less costly than an upright freezer, and we got a chest freezer. I didn’t think that at this time my deep freezer needed any organizing and just loaded it with food. I hang a dry-erase board on the wall next to my freezer to keep track of my frozen food, and start to enjoy my extra space to keep food. For example, when I tried to find a bag of ground meat in my freezer, I needed to dig through it to get it. My hands are cold and I need to take out so many bags before I can find the right bag for my frozen goods. After I open my freezer, it loses cold air when I unload and load all the bags above the bags on the bottom. My freezer needs to work longer to get to the right temperature and use more electricity. However, the main negative factor is I change the temperature rapidly around my food. One time, I was distracted by the phone and left a few bags outside the freezer. My phone call took time, I got busy, and in the end, I never went back to the garage this day, where our freezer is. I found a few bags of food the next morning. After that incident, I realized I needed a better organizing system for my chest freezer. I was reading and watching so many videos about it, and in the end, I have a lot to share! Check it out if you’re looking to organize your small chest freezer. I am sure it will be useful!
5 Easy Ways To Organize Your Deep Freezer:
- Shopping bags as separators for different food groups.
- How to eliminate unpleasant odors from a deep freezer (any freezer).
- A magnetic dry-erase board is the best way to keep the inventory.
- How do I inventory the freezer chest if I don’t have space in the main freezer to keep frozen food?
- The perfect place to keep instructions and extra parts for the chest freezer.
- Update about my deep freezer performance.
 Recommended ⇒ 5 Best Ways to Store Tomato Paste After Opening a Can
1. Why I Like To Use Shopping Bags As Separators In The Freezer?
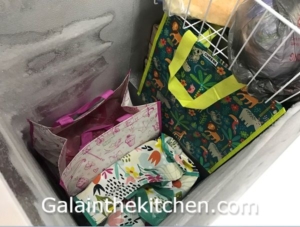
The best way to separate different food groups is to use shopping bags or canvas bags as deep freezer organizers. This way we don’t spend unnecessary time with the lid open searching for items in the freezer. I just remove the bag I need and close the freezer’s lid. My bags don’t hold more than I can able to lift and it is important for me. And another reason I like to use bags is to organize my small chest freezer the bag is emptied it collapses down and only takes up as much space as needed for the contents.
Some people use metal baskets or plastic baskets. I was watching videos where people use plastic baskets as separators and noticed, that on the bottom of the freezers were noticeable dents. Every damage on the surface inside the freezer can possibly lead to system damage, so be careful if going to use baskets. I use one plastic basket too in my freezer to keep frozen berries but always put it on top of other bags, so it not going to damage the bottom of my freezer.
I bought my shopping bags for $1 each at a local store. Make sure bags don’t have a strong plastic odor. It will be easier to recognize food groups if we store food in bags with different patterns or colors. For example, if we have green for vegetables and red for meat is perfect. Just reflect on a guide to the color code for other family members. My bags have different patterns and I labeled them. This way we can easy to see which food group is in the bag.
*Soft cheeses aren’t ideal for freezing. While their texture can change significantly, hard or semi-hard shredded cheese is a great option to freeze and use for cooking. Especially when you’ve purchased a pound of cheese and can’t consume it fast. Often use frozen shredded cheese in my breakfast quesadillas, and it works beautifully! To save time and effort, I prefer to shred cheese using an electric shredder or a food processor. However, if you’re using a manual grater, here’s a simple but effective tip: lightly coat the grater with a small amount of tasteless vegetable oil. This makes the cheese shredding easier.


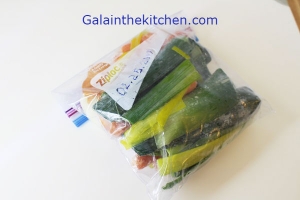
If you shopping for bags, make sure to choose a bag with a flat bottom, as in the picture below. The bag stays well on the surface.
Tip 1
If you need an additional basket for your freezer, you can find it online for a reasonable price. Just make sure you get the right size for your freezer. I found the basket for my freezer but changed my mind to buy it. The reason is an inconvenience to take out food. I have a small freezer and if I add a basket, I always need to take out one of the baskets when need to access food.

Tip 2
We can use shipping or cardboard boxes instead of bags to keep separate food groups in the freezer. This solution works better for larger freezers, in my opinion.
 Recommended ⇒ 11 Ways To Use Baking Parchment Paper In The Kitchen
How To Clear The Odor In The Deep Freezer
The first step in removing odor from the freezer is to find and remove food that is giving off an odor in the freezer. The next step depends on how intense the odor is. If you have leaked liquid on the surface, I suggest defrosting the freezer and washing it. This is what I will do if it happens to my freezer. Inside the freezer, the temperature is low, and the freezer should be unplugged before cleaning to avoid electric shock.
From my experience, if I add foods properly wrapped or sealed, my foods do not give off odors. This way, my freezer has a normal odor-free environment. However, sometimes accidents happen to anyone. If it happens to you, don’t worry! Check out a solution on how to clean the odor in your deep freezer.
1. Baking Soda Removes Bad Odor From The Freezer
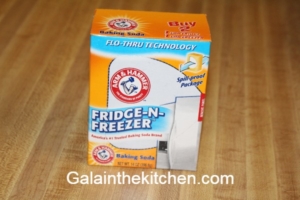
The best way to clear odor in a deep freezer is to place baking soda inside the freezer. If you never tried soda to remove odor from the freezer or refrigerator, you should try it because it works great! The best area to place the baking soda is the basket on the top because it is the most air-circulated area inside the freezer. I paid for my fridge and freezer baking soda from Arm and Hammer company at a local grocery store slightly over $1 after-tax. Great about this product is it has protection from spills. It is important, especially if you have kids. You can find on the market other products from this company or others but I suggest what I use and know baking soda absorbs and eliminates odors very well. Works like a charm!

*I have been using simply an open box of baking soda to deodorize food odor in my refrigerator for many years. Just an example, someone didn’t cover the top of the dish tightly enough, as a result, my refrigerator got an odor. What did I do? Soda is the solution to deodorize a freezer and refrigerator. I usually place it on the top door shelf where more air circulates.
Tip 3
We can also try to use a container with activated charcoal or odorless cat litter (if you have a cat) and set it in an empty freezer. Run the freezer for 2-4 days to absorb the odor. A tip I learned from the Home Depot website. 2 other natural methods to neutralize unpleasant odors in the freezer are freshly sliced lemon or beans of coffee. I personally didn’t try these methods, but they may be useful for you.
How To Use ARM & HAMMER Fridge-n-Freezer Odor Absorber For Deep Freezers
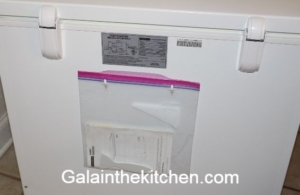
Remove the perforated parts on both sides of the ARM &HAMMER Fridge-n-Freezer box. Place the box in the basket or the top of the area in your freezer, as shown in the photo. Give a time like overnight or so and it clears the odor of your freezer. Inside of your freezer will smell like a new one again if you remove the source of the odor, of course. I don’t keep soda permanently in my freezer, because it takes up space, and no need for it there all the time. I place an open box in a plastic bag and use it when I need it again. According to the package we can use it for 1 month and need to change after. It depends on your needs. For me, this box of soda works much longer than a month.
How To Remove a Strong Plastic Odor Inside a New Freezer Easily?
We bought a brand new upright freezer. I was super excited and filled it with food. After a day or two, I noticed a strong plastic odor inside. How to remove plastic small easily? I know soda works well in the past, and I put two soda containers in my new freezer to make sure it works fast. Guess what? Magic happened! The plastic smell disappeared like it was never there. I kept soda for a week in the freezer and then removed it. Now the plastic odor is gone and my freezer works as well as I expected!

 Recommended ⇒ 11 Ways How I Use Wax Paper In My Kitchen
3. How I Keep Inventory Of My Deep Freezer

*We keep our freezer in the garage. So you can see my husband’s new engine for his car and other his garage treasures around. If for some reason erasers and markers do not stay well to the sides of the freezer, place them in the bag on small hooks on sticky plastic stripes.
Very important to keep an inventory of my deep freezer. I learned it is impossible to keep in my memory what I have there, especially expiration dates. I have a small freezer that is a 5.0 cubic feet capacity, but so much food can fit there, and keeping a list of food in there is a good idea. The best way for me to keep an inventory of food in my freezer is to use a dry-erase marker whiteboard. It is easier for me than writing on paper using a pencil. After I add or remove food from the freezer, I reflect on it on my board. I write on the board dates when I place food in the freezer or the expiration date, so first I pick the earliest date packs because easy can able to see the data on the board.
I use a magnetic dry-erase whiteboard sheet pad for the refrigerator. We can place it directly on the top of the freezer and it stays on the top of the freezer. When we open the door, the sticky whiteboard stays perfectly on. We can also place it on the side of the freezer as well but it is up to your preferences.
I separate my board into two sections left side and the right side. The right side has elevation on the bottom of my freezer and I usually keep my basket on this side. For the bag’s name, I made labels because in most cases it is permanent. So, I will write everything with a marker that I put inside the bags because it changes from time to time.
I write the amount of bags and the date when packaged food is on the board. Instead of numbers, I write “I” letters. For example, if the number 6, I write six letters. It works better for me than writing numbers. Instead of erasing numbers and then writing a new one, I just erase the amount of bags taken out of the freezer.
💡 Tip: How to Clean a Dry-Erase Board (Easy and Effective Way)
Over time, dry-erase boards can develop stubborn stains from markers that regular erasers can’t remove. I tried dish soap and it didn’t work for me. If your board no longer looks clean, here’s a simple solution that really works! I clean my whiteboard using rubbing alcohol and a paper towel — it removes even old, dried ink and leaves the surface spotless. Just pour a small amount of alcohol onto the towel and gently wipe the board. You’ll see the ink lift off instantly, and your board will look like new again.
Tip 4
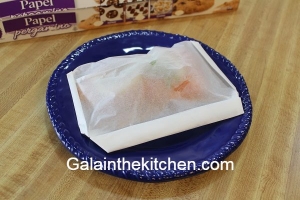
Label your bags and containers! I write what food I have and the date when I placed the food in the freezer for storage. If frozen meals, instruction is very helpful. Write how to thaw or place directly in the oven, and how to cook the meal for your family members.
*In the photo below, tomato paste.

Recommended ⇒ 6 Best Ways to Store Tomato Paste After Opening a Can
4. How I Keep Food Frozen If Need To Clean Or Organize My Deep Freezer

I need to empty my freezer to move to another place, do inventory, or just reorganize it. What do I do with frozen food? Leaving frozen food outside the freezer is not a good idea and the main freezer doesn’t have enough space at my house. I use a large ice chest to keep food frozen when I need food out of my freezer chest. However, not everybody has a large ice chest. If you don’t have one, use a blanket but make sure you use plastic around food to protect the blanket. The blanket will keep the low temperature very well for some time, and you don’t have to have a large ice chest. This way we don’t have to worry about our food starting to thaw so fast, and we have time to organize the freezer.
 Recommended ⇒ 13 Ways To Use Aluminium Foil In The Kitchen
5. Convinient Place To Keep Manual And The Plastic Scraper For The Freezer
For convenience, the best way is to keep a manual and plastic scraper on the backside of the freezer. This way we don’t have to look for the manual when need it and we never lose it too. It will be always next to the freezer. I placed the manual and plastic scraper in the plastic bag and attached them to the back of my freezer. It’s the perfect place, in my opinion. I used small hooks on sticky plastic stripes to hang my plastic bag. The reason I use sticky hooks, I can easy to remove them because according to the manufacturer, it is damage-free hanging. For example, we want to sell the freezer and the clean surface is a big plus. In the photo above, I show how I attached my freezer manual to the freezer’s backside. I bought these inexpensive hooks at our local for a few dollars. These hooks can hold according to manufacture instructions up to o.5 pounds or 225 g and I don’t need more for this purpose. These hooks are always handy to have on our hands. I use them to hang my cleaning gloves under the kitchen sink. Of course, we can use other methods to attach the plastic bag to the freezer. I just sharing how I did it.

![]() Recommended ⇒ 15 Creative Ways to Use Plastic Wrap in Your Kitchen
Recommended ⇒ 15 Creative Ways to Use Plastic Wrap in Your Kitchen
Tip 5
How To Keep Food From Spoiling In A Chest Freezer Without Electricity
The chest freezer works more efficiently if it is fully loaded. If you temporarily don’t have much food in it, I suggest having a frozen gallon of water in it. I freeze water in my refrigerator freezer first and then place it in the deep freezer. This way no exchange of temperature with already frozen food in my deep freezer. It is what we usually do when preparing for hurricanes in Louisiana. If we don’t have electricity after bad weather, our food is well preserved and not going to spoil. If we don’t open our freezer, food will be perfectly frozen for at least 12 hours without connecting to the portable generator ( I am talking about a hot summer in Louisiana, USA). Of course, time depends on the size of the freezer, how much food is in it, and the temperature in the room. The key is DON’T OPEN THE LID and let cold escape when the freezer is without electricity. The same rule applies to the refrigerator as well.
Here are the main tips for keeping food from spoiling in a chest freezer without electricity:
- Keep the lid closed. If we have to open the lid, cold air will escape, and your freezer doesn’t keep a low temperature for long.
- Cover the freezer with blankets. This simple step gives additional insulation and keeps the temperature stable inside the freezer.
- Relocate the freezer to a cooler environment (like a room with generator-powered air conditioning). A cooler environment will help to slow down the thawing process.
- Keep a frozen jar of water with a coin placed on top of the ice. We use gallon water jars. This is an indicator of food safety during power outages. If the coin sinks to the bottom, it means the ice melted and refroze, suggesting the food inside may have thawed and is no longer safe to eat.
Update 2024
After using my chest freezer for a couple of years, it is quit working. We bought an upright freezer. The reasons for this change are improved accessibility to food and the ability to have a larger freezer with a smaller footprint. An upright freezer is much more convenient for storing items compared to digging through a deep chest every time I need to find what I am looking for. Additionally, they utilize vertical space more efficiently, allowing us to have a larger freezer capacity in the same amount of space. However, it is better for my family and not for everyone.
Farmers prefer chest freezers. For long-term storage, a chest freezer maintains temperatures more efficiently. Another reason to choose a chest freezer, we can easily accommodate larger and bulkier items than in an upright freezer.
*If you plan to put your freezer in the garage, ensure it is a “garage-ready” model. “Garage-ready” freezers are specially designed to prevent the motor from failing to operate in the extreme temperature swings, which are common in garages.
 Recommended ⇒ Pan-Fried Salmon Without Oil Or Butter On Baking Paper
Tip How Properly Set Up Deep Freezer
The tip is essential to make the right setup; it is applied to any freezer. Please read the instructions, it is so important! My husband is a Tex guy and he handles the setup. For example, he told me not to plug in the freezer after it was delivered. We let it stand for over 24 hours, so it settles, and only plug it into the outlet directly. Small tip, but it affects the proper performance of the freezer in the future.
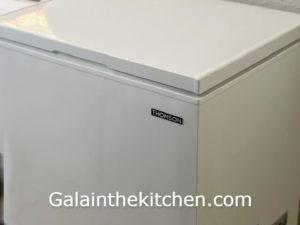
My son’s family has had a larger GE freezer for more than 15 years! They bought it at Sam’s Club, too. Son’s family keeps a freezer in the garage; you can see his freezer in the photo below.

 Recommended ⇒

 @Galainthekitchen.com
 @Galainthekitchen.com


 @Galainthekitchen.com
 @Galainthekitchen.com
Leave a Reply
Want to join the discussion?Feel free to contribute!