
⇓ Watch 1 Video ⇓
How To Use And Clean Girolle Cheese Curler for Tete de Moine With 7 Tips

The Girolle is a special tool designed to create delicate, flavorful rosettes from Tête de Moine cheese or other semi-hard cheeses. It is the perfect tool for an impressive cheese presentation for holidays and special occasions. I own a wooden base Girolle and will share my helpful cleaning tips, so it looks new without any greasy spots. Marble-based Girolles can be a great choice since they’re easier to clean than wooden ones. However, I opted for the wooden version because it’s much more budget-friendly for a tool I primarily use during the holidays. Some Girolles come with a protective dome cover, but mine didn’t. I found a simple way to make one myself! I’ll show you how easy it is to create your own cheese cover for Girolle!
On this page, you’ll find:
- How to Assemble a Girolle: A helpful tip I learned from experience.
- How to Use a Girolle Curler: Step-by-step directions to create perfect Tête de Moine cheese curls.
- How to Clean a Wooden Girolle Base: Useful tips to keep your Girolle looking and functioning like new.
- DIY Dome Cover for the Girolle: A guide to making your own protective cover for the cheese curler (easy!).
- How to Sharpen the Blade: My method for refreshing the blade.
 Recommended ⇒ 7 Tips How To Serve Tete De Moine Cheese
1. How To Assemble A Girolle Curler

Girolle has 4 parts a wooden base, a post, a screw, and a blade with a handle. Assembly is simple! However, one step we need to pay more attention. It is what instruction is for. It was clear in my instruction! However, I thought it was so easy and made a mistake and lost part. Learn from my mistake!

Direction How To Assemble:
1. Insert the metal rod into the center of the wooden base. Be mindful of the four sharp metal blades designed to securely hold the cheese in place.


2. Secure the rod with a screw underneath. Tighten the screw with screwdriver. Tightening the screw is important, read why!
My Girolle Screw Mishap: A Lesson Learned!
At our Thanksgiving family gathering, I let the kids assemble my girolle. They did a great job, but since we didn’t use a screwdriver, the screw wasn’t tightened properly. The girolle was moved between tables multiple times—it was a huge hit and so much fun for the kids!
However, the next day at home, I realized the screw was missing. Thankfully, my husband replaced it and even attached a tool to keep it secure. Lesson learned: Always tighten the screw with a screwdriver to avoid losing it!
Tip 1
Add small screwdriver to the girolle box and it will be remaining to tighten the screw and always will be on hand.

3. Attach the rotating blade by sliding it onto the post.
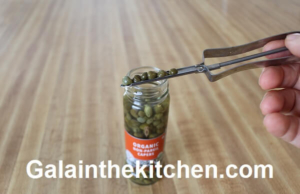 Recommended ⇒ 5 Clever Tools To Get Capers Easy Out Of Narrow Jars
2. How to Use a Girolle Cheese Curler
How to Prepare Cheese for Rosette-Making:
- For the whole wheel of cheese. Begin by slicing off the top of the cheese, approximately 5 mm, to create a smooth surface.
- If the bottom rind is uneven, shave it slightly to create a flat base, ensuring the cheese remains stable when placed.
- Leave the rind on the sides intact—it will naturally detach as you create rosettes.

Placing Cheese On Girolle:
How to Secure the Cheese for Perfect Shaving
- For a whole head of cheese, place the cheese on the cutting board first with the flat side facing down.
- Hold the baseplate firmly with both hands and carefully push it perpendicularly through the center of the cheese. Move slowly by the point a post meets the cutting board.
- Place girolle on the baseplate and press the cheese down. Make sure the cheese firmly stays in the four blades at the bottom. This step is important to keep the cheese stable and prevent it from moving while rotating the blade.
If you’re using a half-wheel, simply slide it onto the top of the post.
How To Make Cheese Rosettes:
Gently rotate the blade with one hand while holding the baseplate steady with the other. With minimal pressure, you’ll effortlessly create delicate Tête de Moine cheese rosettes.
Tip 2
Cheese should be served chilled straight from the refrigerator. As it sits on the cheese board, it will gradually warm up. No worries—warm cheese will still curl beautifully!

What Else Can We Use a Girolle For Besides Semi-Hard Cheese?
2 more ways to use a cheese girolle beyond cheese curling. A cheese Girolle curler isn’t just for cheese! We can also use it to make chocolate rosettes, I saw this on YouTube. Great idea to decorate pastries! Some restaurants use a cheese girolle to serve butter. I haven’t tried myself using a cheese girolle to shape chocolate or butter yet, in my opinion, it is more for bakeries and restaurants. However, if you’re feeling adventurous, it’s worth experimenting with!
 Recommended ⇒ How To Make Pinwheel Toasted Bread Cups

Video How To Use Girolle To Make Tete De Moine Rosettes
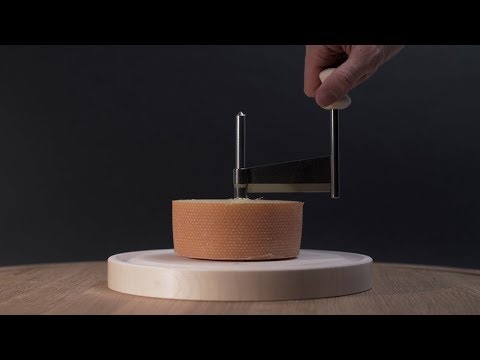
I appreciate the company Tete De Moine for giving me permission to share this beautiful video with you on my website. Gala
 Recommended ⇒ 13 Ideas How To Make Heart Shaped Food
3. How to Clean a Wooden Baseplate Cheese Girolle
I’m going to share my tips for keeping your wooden Girolle looking and smelling like new. Since Tête de Moine cheese, like any cheese, leaves behind grease and a distinct aroma, simply washing with warm soapy water isn’t always enough, especially if the cheese has been stored on the Girolle for a few days. While the ideal is to clean it after every use, that doesn’t always happen. Follow my directions, and your girolle will stay spotless and odor-free, just like new!
Tip 3
Use a brush for your girolle to sweep away cheese crumbles and soda when cleaning. Be cautious—the blades at the bottom of the baseplate are sharp and can easily catch your fingers.
 Recommended ⇒
⇑ The photo above has some leftovers from cheese. I had my girolle in a worse staining condition and my method to clean it always works! ⇑
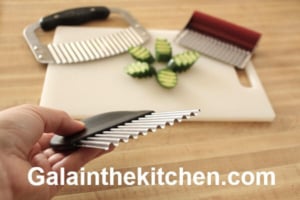 Recommended ⇒ 13 Ideas How To Use A Crinkle Cutter To Garnish Food
How to :
- Remove the blade and unscrew the post from the base. Wash with warm soapy water and dry well. I suggest also to attach the screw to the post when put away for storage.

2. Remove with a brush or sponge the remaining cheese (remember about blades!). Then, wash the area with warm soapy water. Cover with baking soda the base of girolle and let it sit for a few hours, or overnight if necessary.

3. Shake off the soda (or use a brush to swipe it away ) and clean the base with warm soapy water. Dry it thoroughly with a cloth. If the wet base still has a cheese aroma, don’t worry! With proper cleaning, it will disappear as the base dries. Let it air dry completely, then check for any remaining scent. If the cheese aroma persists, repeat the soda cleaning step. You can see in my photo that my Girolle is in excellent condition!
Tip 4
Don’t soak the wooden base in water and don’t use a dishwasher. Both methods cause the wood to warp and damaged it.
4. I store my well-dried girolle in its original box to maintain its quality for the next use.

![]() Recommended ⇒ How to Serve Caviar Russian Style Fancy And Fun Ways
Recommended ⇒ How to Serve Caviar Russian Style Fancy And Fun Ways
4. How To Make Yourself Cheese Cover For Girolle

Storing cheese on girolle in the refrigerator can be tricky. With a cheese cover, you can easily keep your Girolle and cheese protected without having to remove the cheese from the curler. My Girolle didn’t come with a cover. That’s why I came up with my own DIY solution to make a cheese cover—problem solved!
 Recommended ⇒
Tip 5
We can buy original cheese cover without girolle online.
Recommended ⇒ 7 Easy Flower From Peppers Garnish Ideas And More
What I Used:
6.2 oz plastic conteiner
Knife
Electric drill (optional)
Tip 6
We can use instead of conteiner a large size round water bottle. Cut to right hight and use as cheese cover.
How to :
- Make a hole in the center with a sharp object before drilling. I used the tip of a small knife. This step is essential, as it helps prevent the drill from cracking the container, especially if the material isn’t flexible enough. We learned this the hard way with another container!

Tip 7
We can use only the tip of a knife to make a hole. The edge of the hole will be not smooth.

2. Use a drill to smooth the edges of the hole for a clean, polished finish.

 Recommended ⇒ 3 Ways How to Make From Chinese Cabbage Napa Flower
5. How I Sharpen Girolle Blade
The blade doesn’t need to be very sharp and sharpen. However, if you feel like need to sharpen, I am going to share what I do and the easiest way to refresh and sharpen the blade. The Girolle blade has a single edge as in Asian knives and is sharpened like an Asian knife. I am using my ZWILLING J.A. Henckels Knife Sharpener because it has an option for Asian knives.
How to :
- Place the blade into a coarse slot and pull the blade toward yourself in the same direction every time.

 Recommended ⇒ Fun And Fancy Cocktail Garnish Ideas With Photos
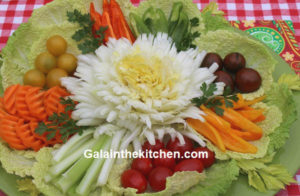
The Tête de Moine Cheese Rosettes
Wow, your guests with stunning Tête de Moine cheese rosettes! These delicate, flower-like curls aren’t just cheese—they’re an edible masterpiece that adds elegance and charm to any cheese platter.
Learn more about Tête de Moine cheese ⇒ 7 Tips How To Serve Tete De Moine Cheese

*In the photo a snowflake-shaped Brie cheese. Learn the easy-cutting method ⇒ Creative Way How To Serve Cold Brie Cheese On A Cheese Board

⇓ Check Out My Other Recipes And Garnish Ideas ⇓

 @Galainthekitchen.com
 @Galainthekitchen.com


Leave a Reply
Want to join the discussion?Feel free to contribute!